It seemed so simple (not really). All I wanted to do was access the Gmail API via Service accounts but this was a long and arduous quest, one that I at points believed my co-workers sent me on as a sort of initiation or snipe hunt (boy scouts should get that reference), if you will.
Anyway, I won’t bore you with all the wrong turns and miscues of it but will just tell you the goal and how to get there.
You see, I’m sub-contracting out to a web development firm and their client uses Google Apps for Education. They’ve got an LMS and when their students login, they want to be able to show the students how many unread gmails they have in their mailboxes. Furthermore, they may want the ability to display the “x” most recent unread messages too.
That said, originally I thought we could just use Oauth and have the very first time the student logged in, they would give the LMS application authorization to read their gmail accounts but that’s not what they wanted. Since this was Google Apps, and the accounts technically belong to the school, they didn’t want to confuse the issue with authorization, have to worry about the students not granting it or dealing with an extra login step. So that’s when I started to investigate using a Service Account.
A service account, according to Google is, “an account that belongs to your application instead of to an individual end user. Your application calls Google APIs on behalf of the service account, so users aren’t directly involved.” That’s what we wanted, to access Gmail API via Service Account. Here’s the principle reference I found from Google on the subject: Using OAuth 2.0 for Server to Server Applications. There are some step by step instructions and I’ll go through them in a moment. But the first thing you need to do is download the client library. I’m working in PHP, so that’s the library I downloaded.
Download the Client Library from Github
You can find the info for the PHP Client library here: https://developers.google.com/api-client-library/php/. If you’ve never done anything with Google APIs and the client library, check out the Get Started area: https://developers.google.com/api-client-library/php/start/get_started but you can find the client library on Github here: https://github.com/google/google-api-php-client. Here are the releases: https://github.com/google/google-api-php-client/releases. I did this with Version 2.0 but I see now that there’s a version 2.02 out there. Whichever you use, download the all the files to your root directory of your application (or if somewhere else, note it because you will need to include them in your program).
Create a Service Account
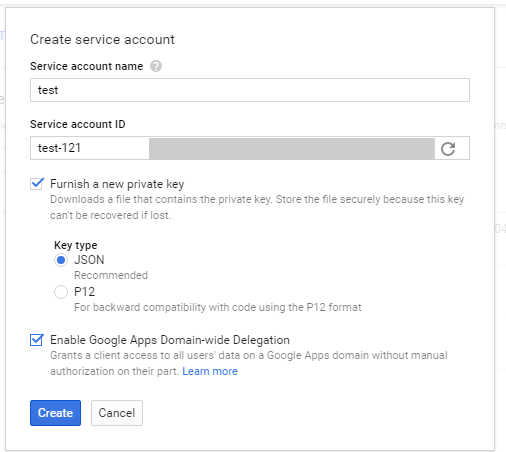
Go to your developers console in Google (https://console.developers.google.com). If you haven’t already done so you will need to create a project, otherwise just select an existing project (Note: I created the service account logged in as a user who had admin access to the Google Apps account).
Open the Service accounts page. If prompted, select a project.
Click Create service account.
You will find Service Account under IAM & Admin in the left sidebar
In the Create service account window, type a name for the service account, and select Furnish a new private key. If you want to grant Google Apps domain-wide authority to the service account (and you should for the purposes of this example), also select Enable Google Apps Domain-wide Delegation. Then click Create.
Your new public/private key pair is generated and downloaded to your machine; it serves as the only copy of this key. You are responsible for storing it securely.
Note that last line about the public/private key pair. I believe that is out of date. They still support this methodology but are now recommending you use the json file and download that. Remember it’s location and it should be stored somewhere that will not be accessible on the web to prying eyes.
For the key generated, I used the JSON file that I downloaded to my local machine, noting it’s location (I put mine in my root folder for my application for this purpose).
Domain Wide Authority
Remember to delegate domain-wide authority when creating the service account as stated:
To delegate domain-wide authority to a service account, first enable domain-wide delegation for an existing service account in the Service accounts page or create a new service account with domain-wide delegation enabled.
Then, an administrator of the Google Apps domain must complete the following steps:
Go to your Google Apps domain’s Admin console.
Select Security from the list of controls. If you don’t see Security listed, select More controls from the gray bar at the bottom of the page, then select Security from the list of controls. If you can’t see the controls, make sure you’re signed in as an administrator for the domain.
Select Show more and then Advanced settings from the list of options.
Select Manage API client access in the Authentication section.
In the Client Name field enter the service account’s Client ID. You can find your service account’s client ID in the Service accounts page.
In the One or More API Scopes field enter the list of scopes that your application should be granted access to. For example, if your application needs domain-wide access to list Gmail (no updates), enter: https://www.googleapis.com/auth/gmail.readonly
Click Authorize.
Now if you want to jump ahead a bit, feel free to page down to the section on the “missing step” as you’re going to want to do that from the Developer’s Console, but if you want to see how it played out for me, just keep reading in this sequence.
The PHP Code
Next, I cobbled together this code, from various sources:
require_once (‘googleapi2/google/vendor/autoload.php’); //This is from the PHP Google library, get that from github and include the library on your machine (in this case it’s local on my PC). I put it in my root directory of my application
$client = new Google_Client();
$client->setScopes([“https://www.googleapis.com/auth/gmail.readonly”]);
$client->setApplicationName(“MyProject”); // I don’t think this matters
//************************************************************************************************************************************
// Either this code
$user_to_impersonate = ‘the email account you want to access’; //very important
$client->setSubject($user_to_impersonate); //important
//***********************************************************************************************************************************
// Or this code – you don’t need both
$client->setConfig(‘subject’,$user_to_impersonate); //either the above method, or this will work
//************************************************************************************************************************************
$client->setAuthConfig(‘downloadedjson-file-name.json’); //this is the json file you downloaded earlier
$client->setAccessType(‘offline’); //not sure this is necessary for this type of call
$gmailService = new Google_Service_Gmail($client);
$googlemessage=listMessages($gmailService, ‘me’); //using ‘me’ means using the subject set above
function listMessages($service, $userId) {
$pageToken = NULL;
$messages = array();
$opt_param = array();
$success = true;
$opt_param[‘q’]=”is:unread”; //this will get us only unread messages
$opt_param[‘maxResults’]=2; //this limits the amount of unread messages returned
if ($success) {
foreach ($messages as $message) {
print ‘Message with ID: ‘ . $message->getId() . ‘<br/>’;
$messageText = getMessage($service,$userId,$message->getId());
print $messageText[‘snippet’];
}
echo “<br />Number of Unread Messages is “. $messagesResponse[‘resultSizeEstimate’] .”<br />”;
}
}
/**
* Get Message with given ID.
*
* @param Google_Service_Gmail $service Authorized Gmail API instance.
* @param string $userId User’s email address. The special value ‘me’
* can be used to indicate the authenticated user.
* @param string $messageId ID of Message to get.
* @return Google_Service_Gmail_Message Message retrieved.
*/
function getMessage($service, $userId, $messageId) {
The code will get 2 unread messages, display their message ids, get their detailed content and print a snippet as well as display the estimate of the number of unread messages that the user has (it’s an estimate and isn’t 100% accurate).
Anyway, when executing that code from my local machine (i.e., my desktop), I crashed and burned with this error:
‘GuzzleHttp\Exception\RequestException’ with message ‘cURL error 60: SSL certificate problem: unable to get local issuer certificate (see http://curl.haxx.se/libcurl/c/libcurl-errors.html)’ in C:\wamp\www\email\googleapi2\google\vendor\guzzlehttp\guzzle\src\Handler\CurlFactory.php:187 Stack trace: #0
Then I got put in touch with someone at Google who said they would try to look into the problem though they don’t normally support the API stuff. I sent that person a ton of information, my code, the error and some array dumps and patiently waited for a reply for 24 hours.
Not exactly but it got me through to a Google error which I unfortunately did not copy but it was basically telling me I never enabled that API! So you see there was a step missing from the Google instructions and that is this:
After you create your service account, go back to the API Manager in the Developers Console, click Library, click on the Gmail API under Google Apps API and enable it. Voila! It worked!!
I’m a big fan of Weaver Themes. I’ve used Weaver II Pro for a while on several sites. I found it to extremely versatile with great support forums. But all good things must come to an end and the creator decided to come out with an entirely new theme that reflects more of today’s design criteria (e.g., responsive design). So while they will continue to support Weaver II Pro for a bit, they are strongly encouraging everyone to design any new sites using Weaver Xtreme, or its expanded version, Weaver Xtreme Pro. Eventually, I will need to convert my Weaver II sites (stay tuned for some blog entries on that experience). Also, I still haven’t decided if I need/want to purchase Weaver Xtreme Pro (again, another blog entry). For now though, I decided to use Weaver Xtreme for a brand new site upon which I am working.
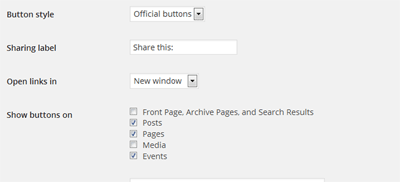
Right off the bat, it’s been pretty easy using the new theme. Many settings are controlled by simple check marks. They are also easily identified. But this week, upon client request, I ran into a bit of a snag. You see, the client wanted a wide screen background behind one section of the site on the home page. In Weaver Xtreme, it’s easy to accomplish this behind the header or footer. It’s simply a check box in the Appearance–>Theme Options–>Header (or Footer) tab.
But getting this to happen in a different area of the site (in my case, the bottom page widget area), proved to be extremely difficult. I started by trying to finagle the widths of different sections of the site via the Appearance panels but that didn’t work. Then I tried by custom CSS but that didn’t work either. I even changed the site so that the entire content area would be wide/full width. I didn’t like the look of that. I wanted the content to be mostly centered and just wanted the background to be different to give the appearance of full width.
So I went over to the Weaver Support Forums and found these tips from “Scrambler”: Full Width Designs. Though it seemed to me that these tips applied more to Weaver X Pro so I asked how to accomplish this using standard Weaver Xtreme and Scrambler came through.
CSS & Settings for Full/Wide Screen Background in Weaver Xtreme
in the Appearance–>Theme Options–>Content Area you must set the Content Area BG to transparent
in the Appearance–>Theme Options–>Sidebar & Layouts, you must set the corresponding Widget Area BG (in my case the Bottom Widget area), to match the color you set in the border-left and box-shadow colors above.
That’s it. Then you’ll have a wide/full screen background behind that widget area on your site.
So yesterday was a bit of a scavenger hunt through the bowels of incredibly old articles on the Internet, resulting in a few dead-ends, some u-turns, false starts and finally pretty successfully accomplishing my goal.
You see, a friend asked how she could redirect her old Movable Type blog to her new WordPress blog so that when people look for her via Google, they will find her most current version. It seems pretty straight forward at first, and if we were just thinking about the high level domain/url for her MT blog, to her WP blog, you’d think a simple 301 redirect would do the trick. But what about all of the individual pages? The Category Archives? The Monthly Archives? Not to mention all of the tags? Redirecting Movable Type Blogs to WordPress is not as straightforward as it seems. If you don’t care about the journey, skip down to the bottom, Redirecting Movable Type Blogs to WordPress Step by Step.
Redirecting Individual Entry Archives
Let me state right off the bat that a lot was written about this … 7 – 11 years ago! That’s right because you see, the version of Movable Type in this case is from 2006 and when WordPress first came on the scene, lots of people were migrating from Movable Type to WordPress, so there was a need for some easy to understand instructions. Unfortunately, though what this meant to me was that a lot of these articles were, well, gone. Let me also state that this assumes you’ve already imported your entries from Movable Type to WordPress and you’ve used entry URLs are formatted in Movable Type as www.yourwebsite.com/yyyy/mm/post_name.ext (where .ext is html, htm, php, etc. – more on this later) and your WordPress URLs (permalinks) are www.yournewwebsite.com/yyyy/mm/post-name/. If you need help with the import, check out: Importing Movable Type 3.x Blogs into WordPress.
To start, I had this article in the WordPress archives: Importing from Movable Type to WordPress. It’s got the basic steps you need to move your blog (import/export) from Movable Type to WordPress but not much on the redirection. It did have a valuable clue, referencing Alex King’s Movable Type Template for Individual Entries, “which you can use to generate pages that will redirect visitors to the corresponding WordPress pages.” That’s exactly what I needed!
On the Hacks page (you need to page down), you’ll find, “Redirect MoveableType to WordPress Template” which you can download. It’s a zip file that contains a PHP template for 301 redirection, an html template for redirection and a readme file. Looking back, here’s about the time I took my first misstep (but I’ll explain why later).
A Sidebar – on SEO (Search Engine Optimization)
It’s one thing to redirect your old Movable Type blog to your new WordPress blog, but it’s another to do it in such a way that search engines (e.g., Google), know that this redirection is permanent and that you don’t want them to look at your old blogs any longer. To do this, you want to use a 301, Permanent, Redirect, which is why right off the bat I chose the PHP template to use for the individual entries and dove right in. You see, it uses a 301 redirect where the HTML template uses a javascript relocate and I’m not sure how search engines interpret that and if they dislike it.
Back on the Redirection Course
Anyway, once I made the decision to use the PHP template, I went over to the MT installation, backed up the existing Individual Entry Archive, and then copied over it with the PHP template, changing the URL in the template. I rebuilt the blog but the new entries did not redirect. I looked at the code and realized (and honestly it clearly states), that the template assumes the URLs are of the format, www.yourwebsite.com/yyyy/mm/dd/post_name.ext. So I took out the code for the days (dd) and rebuilt the blog. It still didn’t work. I added this line to the code, "$title = str_replace('_', '-', $title);" because it seemed to me there was nothing in the function that converts the underscores in the title to dashes (of course, I could be wrong). It still didn’t work.
So I returned to Jonathan Green’s article since he stated that he got this template to work. That’s when I notices he stated:
I should note here that you will have to change the way MT generates pages BEFORE using the new template.
Huh?
So I reread that paragraph again. Yep, you see all the pages on this blog had an .html extension. They needed to be php. But before I accepted that, I re-read Alex’s Read Me file, where he stated,
If you have .html archives but want to use the .php redirects, you can put this in a .htaccess file in your MT directory:
AddType application/x-httpd-php .html
Then all your .html pages will be parsed by PHP
That seemed easier and more straight forward and since I had FTP access to the blog, I created an .htaccess file and uploaded it to the server.
It still didn’t work.
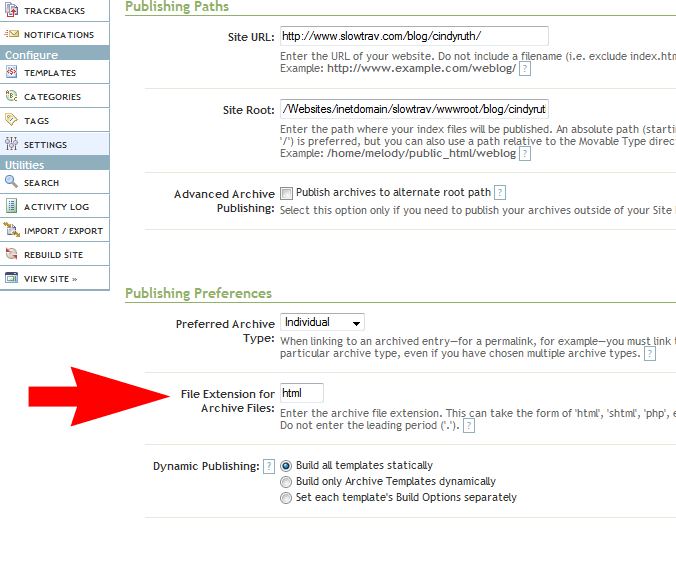
Returning to Jonathan’s advice, I returned the Individual Entry Archive to its original form, rebuilt the blog (so all the html pages returned), went into Settings–>Publishing on the MT Installation, changed the File Extension for Archive Files from html to php (no period), clicked Save, then returned to the Templates.
In Movable Type – changing file extension from HTML to PHP
Then, in the Templates–> Archives, I opened the Individual Entry Archive, copied back in the template file for PHP (with the changes to only do YYYY-MM files directories), saved it and rebuilt the blog.
Voila!
The blog rebuilt with the individual pages having the php extension and those pages automatically redirected to the new blog location!
Wait though. What about all those html pages for the blog? Weren’t they still out there? Oh, and didn’t Google still point to those pages not the php pages that were now redirecting? So yes, while from the MT Blog home page, the links redirected to the new WP blog, it didn’t help with the search at all.
Rereading Jonathan’s article yet again and saw this:
I am still working on a .htaccess redirect for my .html files to redirect to the .php ones so that they can take advantage of the new template as well. This will automatically push someone from Google to the right spot in my WordPress site. Right now I am getting a 500 Error and will need to try again in the am… – See more at: http://www.atmasphere.net/archives/2004/03/29/moving-from-moveabletype-to-wordpress#sthash.srveSLI2.dpuf
Great. I already tried using an .htaccess file and it didn’t work. That’s when something jogged in my memory. You see, .htaccess files are used on servers that operate under Apache and well, I had the sinking feeling that the server on which the MT blog resided was a windows-based server. There was no using an .htaccess file.
So now I was sent researching how to do redirects (now I needed to redirect the MT .html files to the MT .php files which in turn would then redirect to the new WP blog) on a Windows platform. The results weren’t encouraging. The prevailing opinion through the myriad of articles I read seemed to state that they only way to do this was through the admin panel, one file at a time, I had neither the access or desire to do that.
Then I found some articles that indicated I could accomplish this through the web.config file. Long story short though, I could not get this to work either.
Through all this reading, I did see something about using javascript in html to redirect the page to a new site, so I started to investigate that methodology.
The first issue I realized was how would I tell the Javascript the name of the PHP file to which it needed to redirect. I began investigating the manipulation of the MT tag, $MTPermalink which contains the URL of the blog entry. Unfortunately, here I ran into another major roadblock. You see, as I mentioned before, the version of MT used on the blog was woefully out of date and at some point Movable Type removed all of the supporting documentation from this version. I did find some more current documentation that referenced a “Replace” function in correspondence with the current incantation of the MTEntryPermalink field. So I hoped perhaps it was present in our older version. Unfortunately, the replace function did not work.
Then through some more digging I stumbled upon a Japanese blog (I used Google Translate), which had a Movable Type Plugin that appeared would send the Permalink to a corresponding alias. It worked beautifully! Unfortunately though only if the original URL and the Alias URL were explicitly spelled out and it only had places for five aliases. So no using wildcards and no more than five pages could be redirected.
Back to the Javascript issue. That’s when it hit me, I could come up with the PHP file name by recreating it from the Title and Entry date in a similar way to the PHP template, using the Movable Type tags. Here’s a bit of the code that works:
This creates the PHP file name in the variable PHPFileName. Note though the “trim_to” field. This truncates the Entry Title in the same way Movable Type does when creating the Permalink. Make sure yours it’s not longer than your longest file name.
Finally I had the correct url! I put that bit of code in the Head section of the Individual Archive Template (the original one that builds the html pages), right before the end. Then in the body section, at the beginning, I placed:
I’m not sure I had to do it this way. I may have been able to $MTGetVar command right into the location.replace but when I did try that initially, it didn’t work (later I realized I had a typo so I’m not sure if that was the cause for it not working). In the end though, this worked so I kept it!
The Original Error to Which I Alluded
So now I have html versions that redirected to the php versions that redirected using a 301 to the new blog for each individual entry. I’m not sure how this will affect the SEO as the 301 is on the php version not the html but at this point I can’t afford more time on this issue. It’s this morning though, when I went through these steps in my head that I realized if I was giving up on the 301 redirect, I could have just put this bit of code in the html files via the Individual Entry Archive and had them point directly to the new blog. Oh well.
Now, about the other pages in the blog…
Redirecting Movable Type Blogs to WordPress Step by Step
So now we know there are two ways. Using PHP header with a 301 or using Javascript in html.
Using PHP 301 Redirect in the Individual Entry Archive
1. In your html version (if you are starting with html) of your Individual Entry Archive add this code:
<MTSetVarBlock name=”PHPFileName”>http://oldblogwebsite.com/<$MTArchiveDate format=”%Y/%m/”$><$MTEntryTitle dirify=”1″ trim_to=”30″$>.php</MTSetVarBlock> in the Head section, just before the end. Ensure that your Individual Entries follow the naming convention, “http://oldblogwebsite.com/yyyy/mm/entry_name.html” and make sure your trim is to the correct number.
2. Also in the html version of your Individual Entry Archive, just after the “Body” starts, add this code:
3. Rebuild all of your Individual Archives.
4. Now using the PHP by Alex King, referenced above, copy that into your Individual Entry Archive file (paying attention again to the use of days in your archive URL).
5. In Settings–>Publishing, change the file extension (as shown above) to PHP. Rebuild your individual archives again. Now all of the individual pages will redirect to your new blog.
Using Javascript in the Individual Entry Archives via HTML
1. If you don’t care about the 301 redirect, this is much easier. In your html version of your Individual Entry Archive add this code:
<MTSetVarBlock name=”PHPFileName”>http://oldblogwebsite.com/<$MTArchiveDate format=”%Y/%m/”$><$MTEntryTitle dirify=”-” trim_to=”30″$>.php</MTSetVarBlock> in the Head section, just before the end. Ensure that your Individual Entries follow the naming convention, “http://oldblogwebsite.com/yyyy/mm/entry_name.html” and make sure your trim is to the correct number. Note: the dirify is changed from a “1” to a “-” this will return the entry titles with a dash where the spaces are in the Entry Title, making it suitable for a WordPress URL.
2. Add the Javascript from above.
3. Rebuild the Individual Archives and you’re done.
Using Javascript in the Category Archives via HTML
It’s all very similar to the Individual Entry Archives, again, not worrying about the 301 redirect, add this code to your Category Archive page near the end of the head section:
Same javascript as above (though note, I changed the variable name to NewFileName to be more generic. If you use it, you’ll need to update the javascript accordingly).
Using Javascript in the Date Based Archive
Again, all very similar. Add the code below to the Head section just before the end:
Same javascript as above (though note, I changed the variable name to NewFileName to be more generic. If you use it, you’ll need to update the javascript accordingly).
Tags
Unfortunately I haven’t figured out how to redirect these yet.
Overall Site
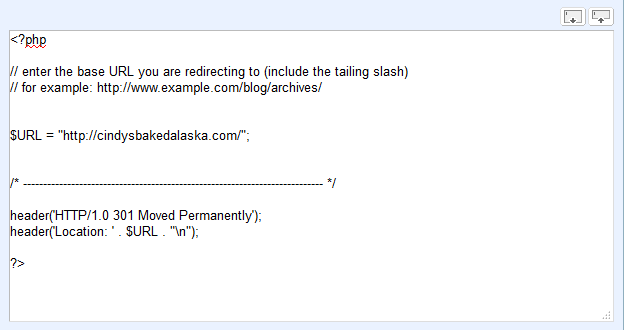
When you’re done with the above, change your main index template to output to php. Then using a modified version of Alex King’s template, to this:
Then save and rebuild. That’s it, your site will totally be forwarded to the new domain.
One of the things I love about developing websites using WordPress is the flexibility you get by using any of the thousands of plugins on the market. So many though feel like fly by night, created once, never updated with the recent versions of WordPress, so it takes some time finding a plugin that not only suits your needs but has support behind it and an inferred promise of maintainability.
That’s why I was glad I stumbled upon Web-Dorado last year. I first used their Form Maker (more on that in another post) and have watched it evolve over the past 16 months, getting better with each release. That’s not to say there haven’t been issues. There have. But I say though that you judge a company by how they handle the issues and the people at Web Dorado have been incredibly supportive. They’ve fixed issues quickly, even logging in to my dashboard to do some minor customizations for me. So when I started investigating the use of a slider (see my home page for an example), after checking out a few others, I ended up choosing WordPress Slider WD (and will be going back to some older sites I’ve done to add this plugin). Anyway, I’ll write more about how to use their slider as I get more comfortable with it. But check out one of the things I put together last night.
It’s one of those things I should probably do more often but I don’t. It’s not glamorous, fun nor does it add any intrinsic value yet it’s a life necessity, kind of like flossing, yes people it’s time to backup my blog.
Here’s the thing though, each time I must backup one of my WordPress Blogs (I have personal ones and some client ones), I always forget the necessary steps involved, so I’m listing them here so I have them next month or before the next time I upgrade WordPress.
Let’s go.
Using my FTP copy the blog directory from my server to my hard drive. (My nightly backups on my Seagate hard drive will make an additional copy the next time it runs). Technically, I don’t need everything as a new install of WordPress would get all of the system files, but for me it’s just easier doing this than picking and choosing.
Back up the database. This is the part I usually forget. You see, it’s not just the WordPress files that must be copied, but the database which contains all of the entries.
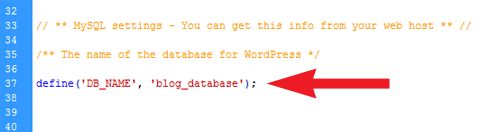
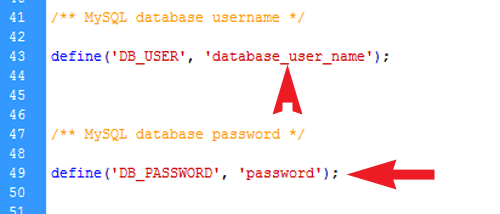
Figure out which database must be copied (assuming you have more than one WordPress installation) by looking in the wp-config.php file you just downloaded in the blog’s root directory.
‘blog_database’ will have the actual name of your WordPress Database
The other information you will need from wp-config.php is your database user name and your password.
Note the database user name and Password
Now go to your PhPMyAdmin from your cpanel, using your database user name and password to login.
Click “Export”
If you do not click an “Output Option” you will receive a popup box that will allow you to save the database to your hard drive. Give it a name (and put in a directory) that you will remember (e.g., blog_name_backup), leaving the .sql extension.
If you hadn’t already figured it out, these steps are for those of you who have a blog on your own host server.
You should really perform this function regularly, like flossing, but you really must do this before upgrading your version of WordPress and/or before moving your installation to a different server.
Unfortunately, there is no perfect solution to this problem. And honestly, it’s only a problem if you have been working on an MT site that hasn’t been updated since 2007. But let’s say you have, and you want to move your blog to WordPress, here’s what you can do.
Exporting Blog from Movable Type
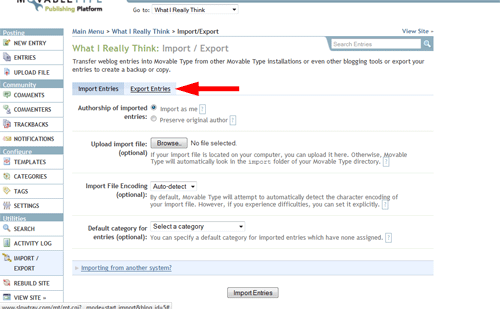
Within the MT blog, click Import/Export in the sidebar. On the next window, click Export Entries.
You are given absolutely no choices when you export entries, so just click the Export button.
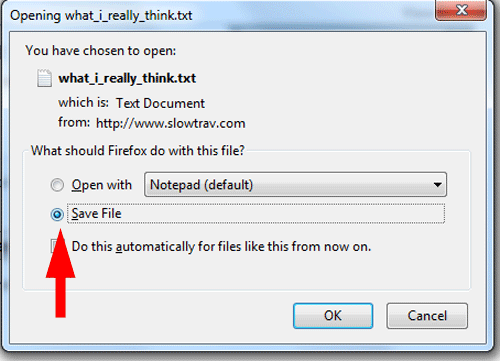
You’ll get a pop-up window asking if you want to view the file or save it. Save it but note where you save it on your hard drive.
The Exported File
So what’s in that file? Take a look (you can use Notepad for this but you’ll get a jumbled mess or you can use Word which gives it a more presentable format). You get:
Entry (post) Author
Entry Title
Status (e.g., draft, published)
Primary Category as well as sub-categories
Date and Time Published
Body
Extended Body
Excerpt
Keywords
Some other random settings (e.g., pings allowed, comments allowed)
Then for each comment, you also get:
Comment Author
Email of Author (assuming your required that on your comments)
IP address of author
URL of author
Date and time of comment
Comment Text
What don’t you have? You don’t have any tags, so if you used those on your blog, they are not getting moved from Movable Type 3.x to WordPress.
Issues with Export File
Links
Any time you linked from one entry of your blog to another, when you import your blog into WordPress, that link will “technically” no longer work. I say technically, because if your blog remains on the original 3.x Movable Type site/server, your link will work, but it will link to the original blog, not the new one on WordPress.
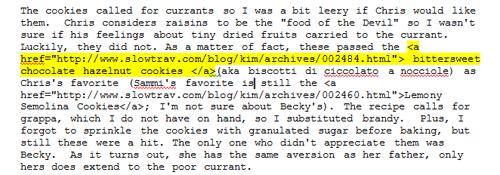
For example, look at the content from the export file below.
This entry has within it a link to a previous entry (http://www.slowtrav.com/blog/kim/archives..). Once this new entry is imported into WordPress, that link will not link to the corresponding entry on the new WordPress site, but will instead still link to the entry on the old site (in this case, under the domain name www.slowtrav.com).
At first I thought I could perhaps go into the text file exported from Movable Type, and do a mass find/replace. In this case that would mean changing www.slowtrav.com/blog/kim/achives to the new domain name for my new WordPress blog (e.g., www.WhatIReallyThink.net), but that won’t work. Why? Because within WordPress, the permalink (i.e., the URL that links to each specific blog entry), won’t have the same naming convention.
Even if you used relative links in your original Movable Type blog (see this article, Absolute vs Relative Paths/Links for a good description of the difference between absolute and relative links), these links still won’t work, unless the permalink naming convention happens to work out the same between Movable Type and WordPress.
So short of editing each individual blog entry once imported into WordPress, these links will either continue to link to the old Movable Type blog, or they will no longer work (if that blog no longer exists).
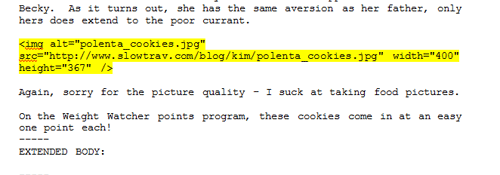
Photos
Photos are going to give you the same/similar issues as your internal links. Again, take a look at the code behind the photo included in this entry:
Just as with the absolute links discussed above, all the images are prefixed with the old (aka Movable Type) blog address, in this case, “http://www.slowtrav.com/blog/kim”. As long as these images still reside on the old MT server, they will still appear on your new WordPress blog. However, if that old MT website/server disappears, so do all of your images.
These though do lend themselves a bit better to a mass change.
If you have FTP access (i.e., the ability to mass download/upload to the server) to both your old blog’s server and your new blog’s server, then technically, you could download all of the images from the old server and upload them to your new server.
Then, within Word (or Notepad), you could mass change all of the image URLs/Links from the old domain name to the new one. Or as I may do in the example above, I could replace all of the “http://www.slowtrav.com/blog/kim/” with “http://www.WhatIReallyThink.net/images/” after having downloaded all the images from the old server, and uploaded them to the new server, in the “images” directory. Then when I import the Movable Type into WordPress, all my old Movable Type entries will automatically post to the new location for the images.
SEO
I don’t really want to get into an in depth discussion on SEO and blogs but to mention one point: search engines do not like when duplicate content exists on the web. What does that mean for you? Well, if you move your content from your old, Movable Type blog, to your new WordPress blog, and your old Movable Type blog still exists on the web, your new blog might get dinged by the search engines, which means less traffic will be driven to your site. You may not care about this unless you are trying to monetize your blog, in which case, less traffic equals less moola.
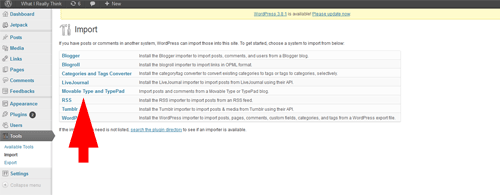
Importing Your Movable Type Blog into WordPress
Click on “Tools” and then Import in the left sidebar. On the next window, click “Movable Type and Typepad”
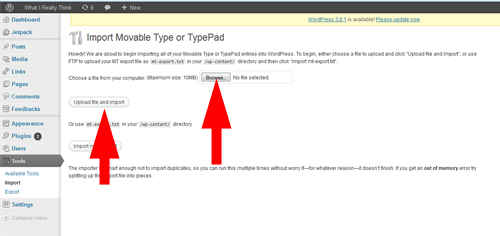
You will be asked for the location of the extract file you created via Movable Type.
Click “Browse” to selection the location of the file, and then click “Upload file and import.”
That’s it. It may take some time for WordPress to actually import the file and if the file is really large, you may get a time-out error. Don’t worry though, you can run the import process again as WordPress recognizes duplicate entries and won’t re-import entries it already imported (it took me two tries to get everything imported). Another option though for really large files, is to break the file into two or more.
Final Thoughts
Given the work involved with a updating the links and images within each entry and the issue with maintaining duplicate content, for the moment, I’ve decided to take a copy of my old Movable Type blog, import it into my new WordPress blog, and then set all those old entries to Pending. This way I have them if anything ever happens with the original site on which I hosted these entries (i.e., they disappear), I can then chose to publish them and correct the links but in the meantime, they are only “live” on the old site with a note over on the old site as to where people can find my new content.